Windows restore point
What is a Restore Point?
A windows restore point is a photo of the system files, registry settings, and programs on your computer at a specific moment. It is a type of backup of the state of your computer.
You may need this feature for system recovery, since it allows you to revert your system back to a stable state in the event of unexpected errors or software conflicts.
Installed and deleted programs are also part of restore points.
Your personal files, like your downloaded music or pictures, are not part of it.
Let us say that your computer is functioning smoothly.
At a moment like this you create a windows restore point.
Now, an unexpected issue arises, causing your computer to behave unpredictably.
In scenarios like this, how nice would it be to revert your computer to the ¨functioning smoothly¨ state?
This is where restore points can help you.
There is no guarantee that it will work, that depends on the type of problem, but at least you have a simple option that you can try.
You have to enable the feature restore points. I will explain this in the section Enabling Restore Points.
When enabled, Windows automatically creates restore points before significant system changes, like installing new software or drivers. This provides a fallback option in case something goes wrong.
You can manually create a windows restore point at any time. To do this, type “restore point” in the Windows search bar and follow the on-screen instructions. I will explain this in the section Creating a Restore Point.
While restore points are a valuable tool for system recovery, it is important to have a regular backup strategy for your personal files and data. This ensures you have a complete backup of your important information in case of catastrophic failures.
Enabling Restore Points
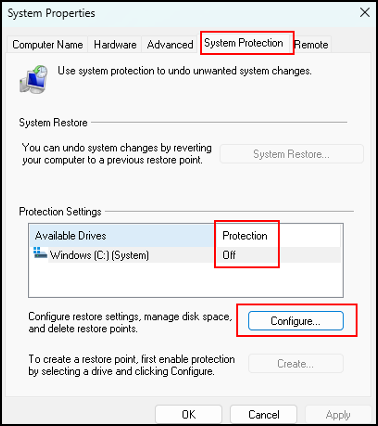
Go to the search bar and type restore to go to System Properties.

When the results appear, click Create a restore point.

The System Properties screen appears, and the tab System Protection is selected.
Protection is Off.
Let us set this to On. Click Configure.
The next screen appears, and “Disable system protection” is the default selection.
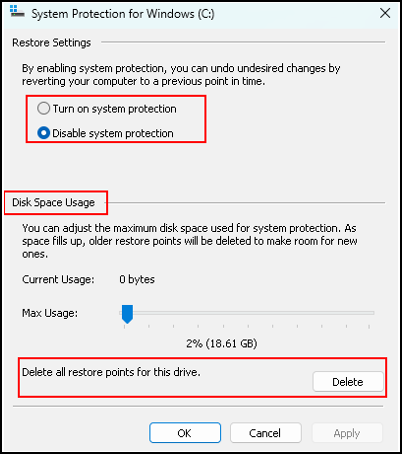
Select Turn on system protection.
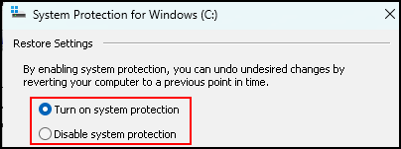
You enable system protection by clicking Ok, after this you can create a windows restore point.
Before we continue, let us first take a quick look at the two other items on this screen.
Disk Space Usage: this allows you to adjust how much disk space you allocate to store restore points. There is a slider to set the disk space, left is less space, right is more. Normally you do not change this, the default is in most cases fine.
Delete button: this will delete all Restore Points on the selected drive. A warning message appears, click Continue if you want to delete all restore points.
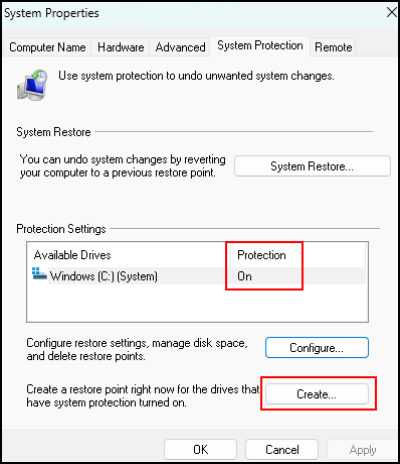
Now that you have set the protection to On, it is time to manually create a Restore Point.
Creating a Restore Point
If you clicked Ok after you selected Turn on system protection you were taken back to the System Protection screen.
Click Create to create a restore point now.
In the next screen you have to type a description, the name, for your restore point. You cannot change the description later on.
The button Create is grayed-out; this is accessible when you enter a description.
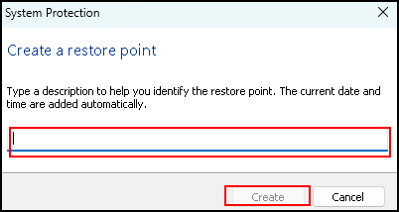
Let us enter a description and create a windows restore point.
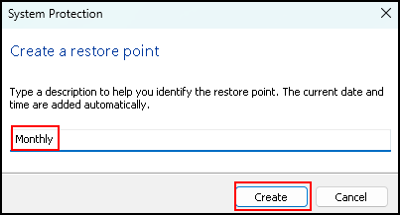
For the description I enter Monthly, next click Create.
The restore point is created, this can take several minutes, a progress bar displays.
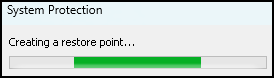
The name of this progress bar is Indeterminate or Marquee progress bar. In situations where the exact duration or amount of progress can not be determined, such as when the completion time of a task is unknown, this bar appears.
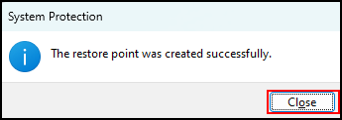
A pop-up message informs you that you created the restore point successfully, click Close to continue.
This is how you create a windows restore point. The next post will be about performing a system restore.
Do not forget to read my second blog om Restore Points here.
Restore points do not affect your personal files. To have a type of backup of these files, read my post on File history here.
For another backup scenario, take a look at my post on File history here.
Internet scammers
Curious about the tactics used by internet scammers to trick unsuspecting victims? Explore the fascinating world of online deception and arm yourself with knowledge by checking out my book. Learn how to spot red flags, protect your personal information, and navigate the digital landscape safely. For more information on my book Digital Thieves, visit my website: https://www.stopinternetscammer.com
Thank you for taking the time to read my post on windows restore point
.I hope you found it enjoyable and insightful.
Stay tuned for more content that is coming soon.
If you like what you read, please consider sharing it with others who might find it helpful.
Disclaimer
All tips and methods mentioned in this blog are tested on Windows 11. Please note that results may vary on other operating systems or versions of Windows. Adapt the instructions accordingly.
Copyright
© 2024 Henny Staas/safecomputer.org. Unauthorized use and/or duplication of this material without express and written permission from this site’s author and/or owner is strictly prohibited. Excerpts and links may be used, provided that full and clear credit is given to Henny Staas/safecomputer.org with appropriate and specific direction to the original content.