Hidden folders
In this post I will talk about hidden folders, and how to hide and display them. Let us dive into it.
Hidden and system folders
An example of these folders in Windows are system folders. Users typically can not see these folders, or access them. Only the Windows Operating System should have access to them. But, as we will see later, you can create your own hidden files and folders.
Here are some key points to consider when dealing with hidden and system folders.
Hidden Folders
Hidden folders are folders that have the “Hidden” attribute set, making them invisible by default in File Explorer.
You can choose to hide folders to prevent accidental modification or to keep sensitive files out of view.
Most hidden folders on your computer are system folder.
System Folders
These folders are critical to the operation of the Windows operating system or installed applications.
These folders often contain important system files, configuration settings, or temporary files necessary for system functionality.
Modifying or deleting system folders or their contents can potentially destabilize the operating system or cause applications to malfunction.
Accessing hidden and system folders
You can access hidden folders in File Explorer by enabling the option to show these files and folders in the Folder Options or View settings.
Windows typically protects system folders. In some cases you need elevated privileges or special permissions to access or modify them.
There is in fact a double protection for these critical files and folders. First, they are hidden, and second you may need special permissions to modify them.
Caution when Modifying
Exercise caution when modifying or deleting hidden or system folders, as doing so can have unintended consequences and may impact system stability.
It is essential to understand the purpose of a hidden or system folder before making any changes and to proceed with caution to avoid potential issues.
View hidden folders
As we have seen in my previous post here you can display hidden folders. Let us do a quick review. Open the Folder Options and go to the view tab. In the middle of the screen you see the option to show, or not show, files, folders and drives. Select “Show hidden files, folders, and drives”.
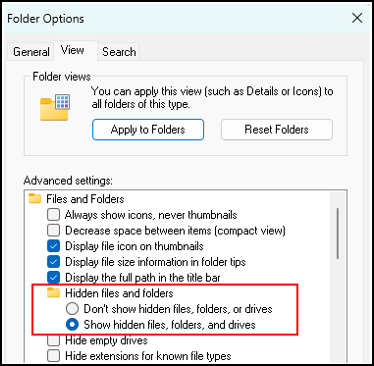
When done, click Apply and OK.
Next, navigate to the folder C:\users
There should be a folder Default, and the icon of it is not the same as the other icons. On my computer it is a very light kind of yellow. This is how your hidden folder is displayed.
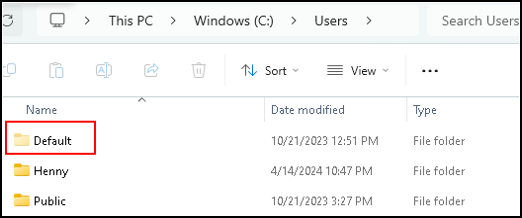
If you do not have Default folder, double click on the folder with your name, and look for the folder AppData. This folder should be there and is hidden by default as well.
Hiding folders
You can hide folders yourself too, and it is really simple.
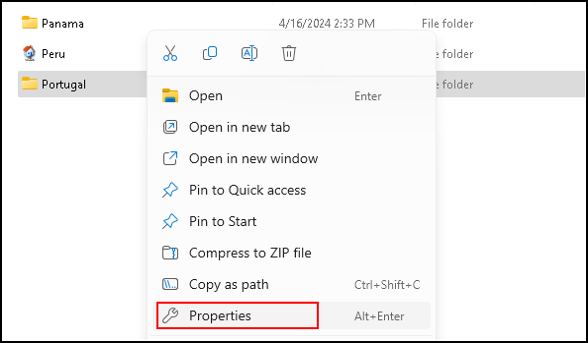
I go back to my Travel folder, right click on my folder Portugal, and select Properties from the context menu.
When the Foldername Properties menu opens, you see Hidden at the bottom.
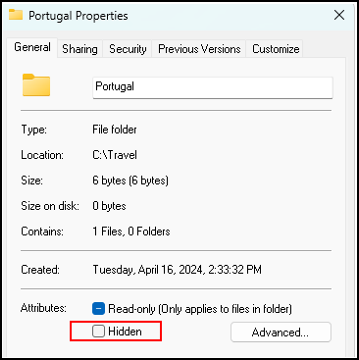
The box is unchecked by default, so let us check the box and click Apply.
A new context menu appears, Confirm Attribute Changes.
This menu tells you that you are changing the folder to hidden.
Next you have to make a choice. Only hide this folder, or hide this folder and all folders and files in it.
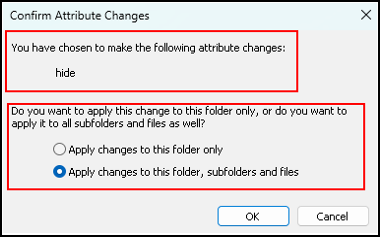
We leave it as it is, and click OK.
Click OK one more time, and the folder Portugal is hidden.

At the moment it is not very hidden, it is still there in a light yellow color.
Let us go back to the Folder Options and select “Don´t show hidden files, folders, or drives”, and click OK

Now the folder Portugal is gone.

This is of course not the best way to hide your folders and files, but it works. When you do this a little deeper in the folder hierarchy it can be a challenge to find it.
Displaying hidden files and folders
In File Explorer, click the View button.

This opens a context menu, and at the bottom, click show, and select Hidden items.
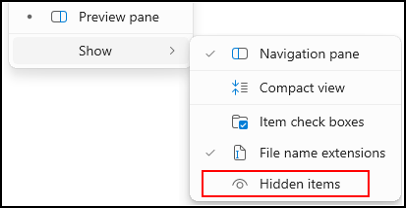
Selecting “Hidden items” will show or hide your files and folder.
This is the end of this post.
In my next post here I will be talking about Invisible Folders.
Thank you for taking the time to read my post on hidden folders.
I hope you found it enjoyable and insightful.
Stay tuned for more content that is coming soon.
If you like what you read, please consider sharing it with others who might find it helpful.
Disclaimer
All tips and methods mentioned in this blog are tested on Windows 11. Please note that results may vary on other operating systems or versions of Windows. Adapt the instructions accordingly.
Copyright
© 2024 Henny Staas/safecomputer.org. Unauthorized use and/or duplication of this material without express and written permission from this site’s author and/or owner is strictly prohibited. Excerpts and links may be used, provided that full and clear credit is given to Henny Staas/safecomputer.org with appropriate and specific direction to the original content.