More Folders
This post is called More Folders, since I will cover the Recycle Bin, more tips on searching in folders, and pinning folders to the Quick Access menu. So again, a longer then expected post, lets go.
Recycle Bin
In this chapter on more folders I will discuss the Recycle Bin.
You can find the Recycle Bin on the desktop, where it is in the left top corner.

Let us see what options we have in the Recycle Bin.
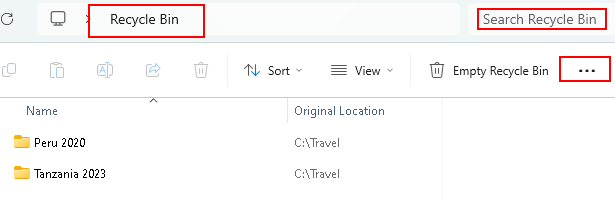
In the right top corner, you see Search Recycle Bin. If you deleted many files, and you know what you are looking for, you can type the name of the file and search for it.
As you start to type in the Search field, everything matching what you type will be displayed. The not matching items will not be displayed anymore.
We have seen this in my previous post Searching Folders.
The search bar
The search bar in the Recycle Bin functions similarly to the search bar in File Explorer. When you type a search query into either of these search bars, they filter the contents of the Recycle Bin or the File Explorer window respectively, displaying only the items that match your search criteria.
This means that if you are looking for a specific file or folder that you deleted and it is still in the Recycle Bin, you can use the search bar there to quickly locate it based on its name or other attributes. Similarly, in File Explorer, you can use the search bar to find files or folders within the current folder or its subfolders.
Here we are focusing on the Recycle BinBut, so let us stick to deleted items. What if you deleted an item some weeks ago. Do you exactly know what you are looking for? Maybe you do not remember the exact name of the file?
Wildcards
This is where wildcards come in. Wildcards are special characters you can use in search patterns to represent one or more characters. In File Explorer, they can be incredibly helpful for finding files or folders when you are not sure about the exact name or when you want to search for a group of files with similar names.
Asterisk (*)
Represents zero or more characters. For example, searching for doc* would match files like document.txt, doc1.jpeg, docfile.docx, etc.. Any file name that starts with doc will be displayed.
Question mark (?)
Represents a single character. For example, searching for file?.txt would match files like file1.txt, fileA.txt, but not file12.txt or file.txt.
documen??.txt would match document.txt, documents.txt, but not documentation.txt because it has more than two characters after documen.
Square Brackets ([ ])
Specify a range of characters. For example, searching for file[123].mp3 would match files like file1.mp3, file2.mp3, and file3.mp3, but not file4.mp3 or file.mp3.
Exclamation Mark (!)
Exclude specific characters. For example, searching for file[!123].txt would match files like file4.txt, file5.txt, etc., but not file1.txt, file2.txt, or file3.txt.
If you are searching for a document and you only know it has “paper” in its name, you can search for *paper*. This will return files like taxpaper.mp4, taxes2024paper.docx, mypapers. Any file type with the word “paper” in it.
Other Recycle Bin fields
The most of the other fields on the menu look familiar already. You can sort the columns, make columns wider or smaller, and there is an option Empty Recycle Bin. This has only one goal, to permanently delete everything in the Recycle Bin.
The next item we discuss are the three horizontal dots…
When you hover the mouse over it, it will display See more. When you click the three dots, a context menu displays.

Empty Recycle Bin: this will permanently delete all items in the Recycle Bin.
Restore all items: this option restores all items from the Recycle Bin to their original locations.
Undo / Redo: if you delete an item, and you click undo, the deleted item will be recovered to its original location.
When you click the three dots right after that, you will see there is a new option available, Redo. This will of course delete the same item again.
Select all, Select none, Invert selection: select all and select none do not need an explanation. If you have three items, and you select the first one, invert selection will the deselect the first one, and select items two and three.
Properties
This brings up the following context menu:
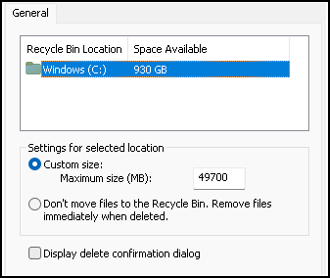
Custom size: the size of the Recycle Bin. If you have no reason to change it, leave it as it is. When the Recycle Bin fills up and reaches this size, the oldest files are deleted to make room for new files.
Do not move files to the Recycle Bin. Remove files immediately when deleted. This option bypasses the Recycle Bin. It does what it says, remove files immediately when deleted. There is no option to undo your action. I prefer to not use this option.
Display delete confirmation dialog: this option will ask you if you if you are sure when you delete an item. You can try it and see if you like it or not.
Options
The last menu item is Options, which has three tabs: General, View, Search. As you see, we are in the Folder Options now. This is not related to the Recycle Bin, but to Folders.
The General tabs can be divided into 5 blocks.
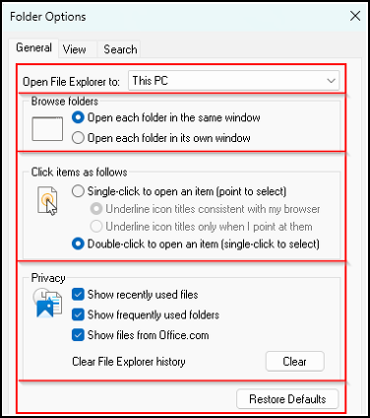
Open File Explorer to: this can be set to Home or This PC, with Home being the default setting. I prefer This PC, but you should try it out and see which you prefer.
Browse folders:
Open each folder in the same window: when you double click a folder it will open in the same window you are already in.
Open each folder in its own window: when you double click a folder, a new window will open and the content of the folder will be displayed in that new window.
Note: when you use the second option you can end up with a lot of open folders. But, try it, maybe you like one better than the other.
Click items as follows:
Single click to open an item (point to select).
Double click to open an item, this is the default.
If you are used to double click, leave it as it is. But there is of course no reason to not try this out. Maybe you like the other option better.
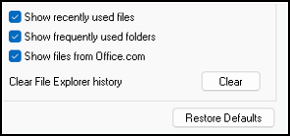
Privacy:
Show recently used files: this will display the last opened files under Recent in the right pane of File Explorer.
Show frequently used folders: this will display recently used folder in the left pane in File Explorer.
The last item is only relevant if you are running Microsoft Office.
Show files from Office.com: this will display your office documents.
These will be displayed under Quick Access in File Explorer. You do need to have Microsoft Office installed.
Clear File Explorer history, to clear the history, click the Clear button.
And, of course, a button to Restore the defaults.
The view tab
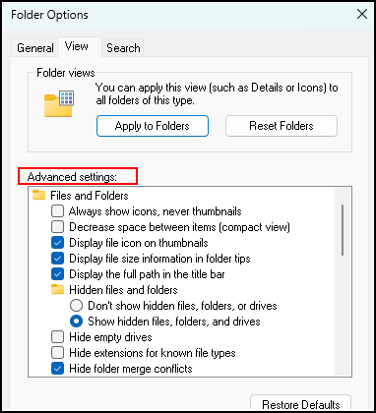
The first part, Folders views, was already covered in an earlier post. You can find it here
First thing, there is a Restore Defaults button in the right bottom corner. So, when you experiment with these settings, there is no reason to worry. You always have a way of getting back to the original settings.
Second, it is about displaying items, not about deleting. So feel free to experiment, but do read what you are about to do.
In the middle, I always set Show hidden files, folders or drives. The default is to not show them, but I like to see them.
For the same reason I unchecked Hide extensions for known file types. Yes, I know what it can be, but I want to see it.
A little below is an option to display encrypted or compressed files in color. And yes, again, I know but I want to see it.
Go ahead and try some different settings. See what the effect is and if you like it or not. You can always use the Restore button.
Search tab:
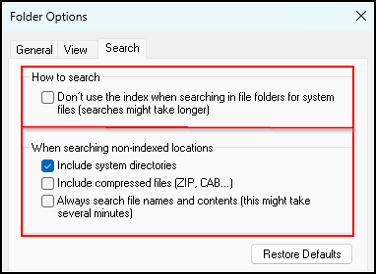
How to search
As you can read, if you check the box the index will not be used. The result is that searches might take longer. So, that means do not check the box.
This is related to system files. Normally we do not want to play around with those. But, here is the difference between unchecked and checked.
Unchecked: Windows Explorer uses the search index for searching in folders containing system files.
Checked: perform searches directly through the file system. This can be useful if you need to ensure that searches in system file folders are as thorough and comprehensive as possible, even if it means sacrificing some performance.
When searching non indexed locations
Include system directories:
When this option is selected, Windows Explorer includes system directories in the search results when searching in non-indexed locations.
This can be useful if you are looking for specific system files or need to troubleshoot system-related issues.
Be careful when modifying or deleting files in system directories, this can affect the stability and functionality of your operating system.
Include compressed files:
If selected, Windows Explorer includes compressed files (such as ZIP archives) in the search results when searching in non-indexed locations.
Useful if you are looking for specific files contained in compressed archives.
Searching in compressed files can take longer compared to searching uncompressed files. The files have to be decompressed before searching their contents.
Always search file names and contents:
Almost similar to the “How to search” section.
When checked, Windows Explorer searches both file names and file contents when searching in non-indexed locations.
This allows for a more thorough and comprehensive search, as Windows Explorer will examine the contents of files in addition to their names. Useful when searching for specific information contained in documents, spreadsheets, presentations, and other types of files.
But, searching file contents is more resource-intensive and takes more time.
Quick Access
In this chapter of more folders I discuss the Quick Access menu. This is like a personalized dashboard in File Explorer that helps you easily access your most frequently used files and folders. It automatically lists the files and folders you use most often, as well as those you’ve recently accessed, making it convenient to find and open them without having to navigate through multiple folders.
As you can see, I have changed my default settings and unpinned all folders.
The default situation can be found here.
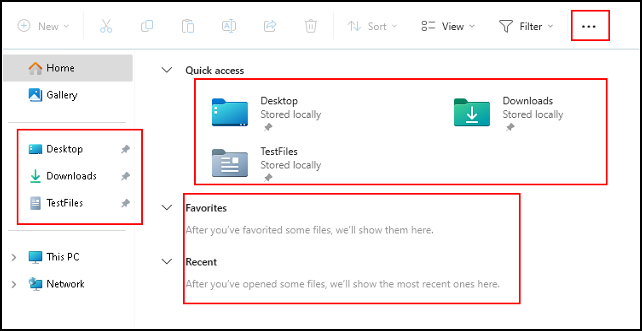
As you can see, three folders are displayed in the right pane under Quick Access: Desktop, Downloads, Testfiles.
These same three folders are also displayed in the left pane in the section called Quick Access.
You probably have many more files under Quick Access, like Documents, Music, Pictures, Videos.
I have no Favorites and no Recent files.
Favorites and Recent
Favorites, the files displayed here have to be marked as favorites by you. You select a file by clicking on it once, then right-click, and select Add to favorites. That is it. If the file is not your favorite anymore, right-click it and select Remove from favorites.
Recent, this was discussed in the beginning of this post. For a quick review, here is it again.
Click the three dots in the right top corner, highlighted in the previous print screen. In the context menu, select Options.
Show recently used files: when checked, displays a list of files that you recently accessed or opened. These files are listed under the “Recent files” section in Quick Access.
Show frequently used folders: when checked, shows a list of folders that you access frequently. These folders are displayed under the “Frequent folders” section in Quick Access.
Unpin a folder from quick access
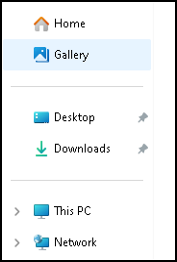
Let us first start to unpin my Testfiles folder. This is a very simple thing to do. First click the folder you want to unpin from the Quick Access menu. When the folder is selected right click on it.

In the context menu select Upin from Quick Access.
And as you can see, the folder is not available anymore in Quick Access.
Pin a folder to quick access
You can of course also add a folder to the Quick Access menu.
First, select the folder you want to pin, in my case the Travel folder.
Next, right click the folder, and select Pin to Quick Access in the context menu.
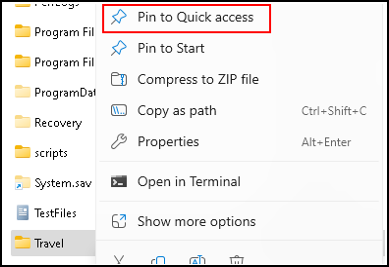
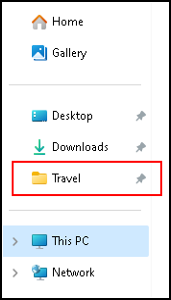
And that is all, now the folder is pinned to Quick Access.
It is of course depending on you specific needs if you want to unpin not needed folders and pin the ones you do need. When you work for some time on some projects, it can be helpful to only pin what you need at that time. This is how I keep my folders organized.
Drag and drop folders to quick access
There is of course another, even simpler, way to add a folder to the Quick Access menu. Once you located the folder you want to add, and you selected it, you can drag and drop the folder to Quick Access. When you drag the folder to the Quick Access menu, you see a message “Pin to Quick Access”. If you decide to pin the folder, release the mouse. If you change your mind, take a little care where your mouse pointer is when you release the mouse. It is possible to move your folder into another folder. So make sure the folder you wanted to move is still in the correct place.
How many folders can I pin to Quick Access?
There are no guidelines from Microsoft on this. That means you can pin as many folders as you want. The downside of having too many folders is that it will take time to locate the folder you are looking for. When navigating to the folder is faster then finding your pinned folder in the Quick Access menu, you definitely pinned too many folders. So, only pin folders you use regularly.
Personally, I never pin folders that are easy to navigate to. If it takes one or two clicks to get to the folder, I do not pin it to the Quick Access menu. When the folders are nested deeper, and I need to access them frequently, I start to pin them.
But, it is a choice you have to make yourself.
Pinning a folder with a keyboard shortcut
This brings us to the final chapter of more folders.
And yes, there is also a keyboard shortcut to pin folders to Quick Access in File Explorer.
Select the folder you want to pin to Quick Access.
Press Alt + F on your keyboard to open the Home tab.
Depending on your Windows version this could be Alt + H or another combination.
A context menu opens:

In “Pin to Quick Access”, the letter Q has underlining. That means you can use the letter q as a command.
So, press q on your keyboard to activate the “Pin to Quick access” command.
Depending on your system you may have to press p on your keyboard to activate the “Pin to Quick access”.
If keyboard shortcuts do not work, it is possible that your system has a different shortcut configuration or that there is a conflict with other shortcuts.
Removing pinned folders through a keyboard shortcut should be possible too. But, unfortunately it does not work on my laptop. If you want you can find it on the internet.
This is the end of this post on more folders.
Thank you for taking the time to read my post on more folders.
I hope you found it enjoyable and insightful.
Stay tuned for more content that is coming soon.
If you like what you read, please consider sharing it with others who might find it helpful.
Disclaimer
All tips and methods mentioned in this blog are tested on Windows 11. Please note that results may vary on other operating systems or versions of Windows. Adapt the instructions accordingly.
Copyright
© 2024 Henny Staas/safecomputer.org. Unauthorized use and/or duplication of this material without express and written permission from this site’s author and/or owner is strictly prohibited. Excerpts and links may be used, provided that full and clear credit is given to Henny Staas/safecomputer.org with appropriate and specific direction to the original content.