Exploring folders
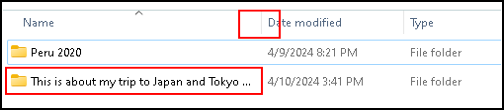
Before we start exploring folders, let us again take a look at folder names. I created a folder with a nice long name. The File Explorer shows only part of the name. Instead of the full text, it displays three dots at the right end.
There are some ways to see what the entire text is.
One way is to place the cursor on the folder and press the F2 key. On a laptop you may have to press the Fn key (or another key) and the F2 key at the same time. This is the rename function. You see the entire text and you can change it. If you accidentally change or delete the text, press the Esc button or the CTRL button and the letter z to restore the text.
I explained other ways to rename folders in my previous post. I provide a link to that post here.
Resize columns
You can also change the size of the Name field by placing the mouse cursor on the left of “Date modified”. The mouse cursor changes to a “resize handle” or “resizing arrow”. It looks like this:
![]()
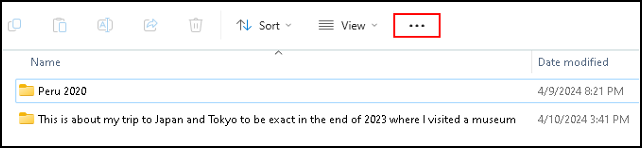
This allows you to click and drag the columns to the right. The result is that the field has more room to display the text:
If you like or need this look, you can easily save this format.
Save the format
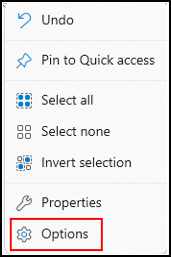
Click the 3 dots in the top, a pop up appears, click Options at the bottom.
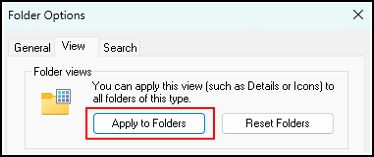
The Folder Options menu opens, click the View tab.

You can apply this view to all folders of this type.
You only have to click “Apply to Folders”.
This can be useful if you end up with a lot of longer folder and filenames. As you can see, there is also a button to Reset Folders. This brings the folder lay-out back to the original state.
Display folders by date
On the right side of the Date modified column is a little down arrow. When you click that an agenda pops up.
I have two folders, modified on April 10 and April 11.
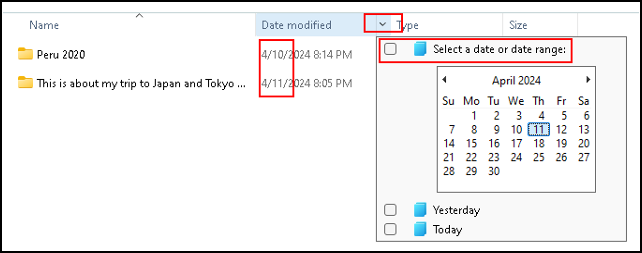
Let us select April 11 in the agenda.
The File Explorer only displays the folder with Date modified is April 11.

Do notice that “Select a date or date range:” is checked.
Uncheck this box to go back to the normal view.
This option is really helpful when you are looking for folders with a specific date, or in a date range.
This works for other columns too, like name, type and size. Since these are not date columns, there is no agenda but other options. Just click the little down arrow on the right of the column and see what happens.
Moving columns
Exploring folders, how to move columns. If you want the column “Date modified” as the most left column, click it and drag it to the left.

The result will be:

There is no undo button for this action.
Moving a column by accident means you have to restore the old situation manually. Another option is to use the Reset Folders button as described in the chapter “Save the format” earlier in this post.
Sorting columns
When you click the column “Name” the column will be sorted. The default is from a to z, but when you click it again the sorting order will be reversed, from z to a. This works the same for all columns available.
When you right click an empty space in the folder, you get a pop-up menu that allows you to sort by a specific column and in an ascending or descending direction.
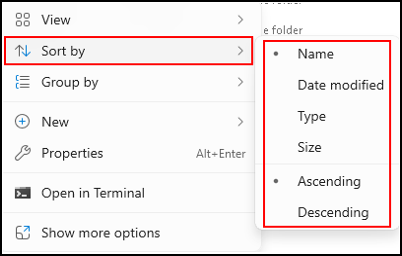
The columns Name, Date modified, Type and Size are the columns displayed by default.
Adding columns
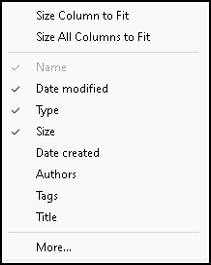
When you right click a column, for instance the Name column, a pop-up menu appears.
In this menu you can simply add some columns, or remove them. The “Name” column can not be selected, this one has to stay. If you want to add the column Authors, just click it and it will be added. To remove a column, simply click it in this menu and it will be removed.
Another option in this pop up menu is to resize one or all columns. The start of this post was about long file names. This is another way of resizing columns in case the names of your folders are too long to be displayed.
At the bottom you see an option More… This shows the complete list of available columns you can select.
Deleting a folder
We have created folders, why not throw one away, delete it. The folder Peru 2020 is selected.
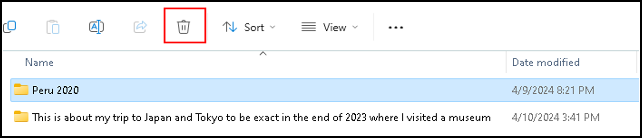
Right above it is the button to delete the selected item. You can also press the Delete button on your keyboard. Or maybe you prefer to right click the folder and delete it from there.
I deleted the item, as you can see below.

The folder Peru 2020 is not gone yet, it is only moved to the folder Recycle Bin.
To get it out of the Recycle Bin and back to its original location, press the CTRL button on your keyboard and press the letter z at the same time. This will undo your last action.

As you can see, the folder is restored.
The Recycle Bin is a sort of safety net for deleted files and folders. Deleted items are first placed in the Recycle Bin. From there, you can decide to delete them or restore them.
There is a way to bypass the Recycle Bin. When you press the Shift key, and press the delete button at the same time, you delete the selected item directly. It will not go to the Recycle Bin, and you have no option to undo this action. Gone is gone.
Navigating
When you are in the File Explorer and you press the Backspace key, you move to the previous opened folder.
The same may work with the Alt button and Arrow left key at the same time. This is unfortunately not consistent in Windows versions.
You can also select a folder by clicking on it in the address bar. Let us take a look at the screen shot below.
We are in the Peru 2020 folder, the address bar displays: This PC > Windows (C:) > Travel > Peru 2020.

The red highlighted block on the right is called the address bar. In here you can place the mouse cursor on the name Travel, and when you click it, you are taken to that folder.

And yet another way to move through folders is with the navigation arrows. These are the arrows left, right, up, and the circle in the left top corner. These are highlighted in the picture below.
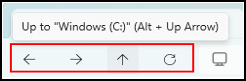
When you hover the mouse cursor over it, it will display which folder you are going to. In the example above to Windows (C:). It also displays the keyboard shortcut you can use to go to that folder, Alt key + arrow up.
Special folders
Special Folders, also called system folders or shell folders.
There is actually not much special about them, they are just folders in your user folder. What makes them special is that they are pinned to the navigation pane, and only the person logged on to the computer has access to them.
Below is a screenshot. On the left is the navigation pane. On the right is the content of the user folder, as you can see in the address bar (C:>Users>Henny). The navigation pane provides quick access to the user folder. Also part of this is the Recycle Bin. You can only see the files and folders you deleted.

Who has access?
There is one important thing to say about these folders. Since they reside in the users>your-name folder, they can not be accessed by other users who log on to your computer. This is of course only relevant if other users can also log on to your computer, like when you share your computer.
If you create a folder in the root folder, like we did with the travel folder in my previous post, everyone who can log on to the computer has access to it.
This is important, so we go through it one more time.
When you place a file in a sub-folder of the root folder, everyone who is logged on to the computer has access to it.
When you place a file in the special folder Documents, only you have access to it.
This is the situation for normal users. The security best practice is to log on to your computer as a normal user, and not as administrator.
Since these special folders are not visible to everyone, they are easily overlooked when making backups or copies of the files and folders on the computer.
So, if you want to use the special folders to store your files, make sure that you make a backup yourself.
This advice is not only for you, it is for every user who logs on to that computer and stores files in special folders.
Next to that, someone has to be responsible for backing up any other folders that have user data in it.
Desktop folder
There is one special folder that needs a little attention, the Desktop folder. This folder contains shortcuts to files and folders that appear on your desktop. Sometimes you end up with more items on your desktop then expected. When you are looking for a specific item, it can be hard to find. In cases like that it can be easier to go to your Desktop folder and locate the item there.
Personally I do not use these special folders, except for the Desktop folder. As I said before, I create one folder with sub-folders in it. This way I only have to make a backup of one folder to have an extra copy of all my files.
Here we are, at the end of this post on exploring folders.
There is more on searching folders and files here on my next post.
Thank you for taking the time to read my post on exploring folders.
I hope you found it enjoyable and insightful.
Stay tuned for more content that is coming soon.
If you like what you read, please consider sharing it with others who might find it helpful.
Disclaimer
All tips and methods mentioned in this blog have been tested on Windows 11. Please note that results may vary on other operating systems or versions of Windows. It’s recommended to adapt the instructions accordingly.
Copyright
© 2024 Henny Staas/safecomputer.org. Unauthorized use and/or duplication of this material without express and written permission from this site’s author and/or owner is strictly prohibited. Excerpts and links may be used, provided that full and clear credit is given to Henny Staas/safecomputer.org with appropriate and specific direction to the original content.